Peanut Brittle {Microwave Peanut Brittle}
This page contains affiliate links. For more information please read my Disclosure Policy.


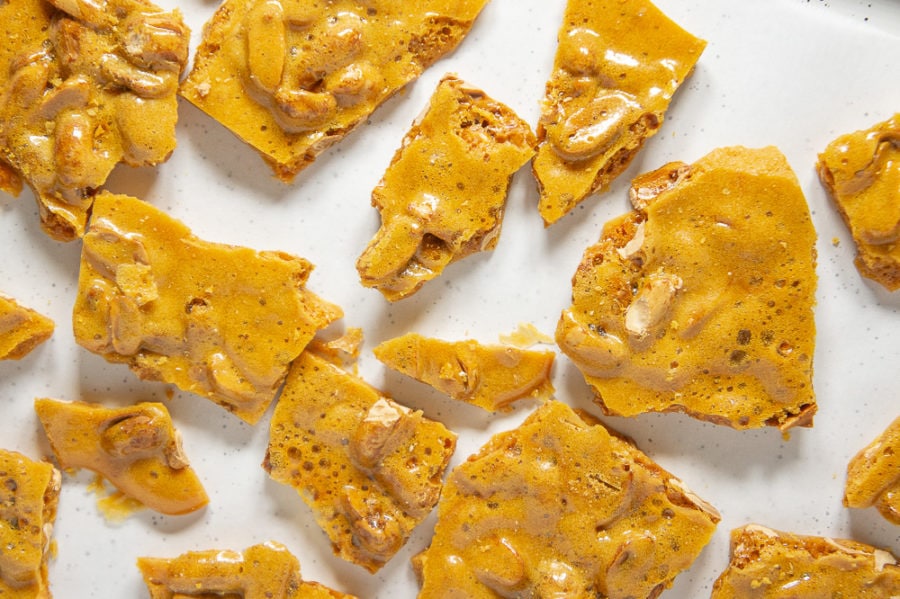
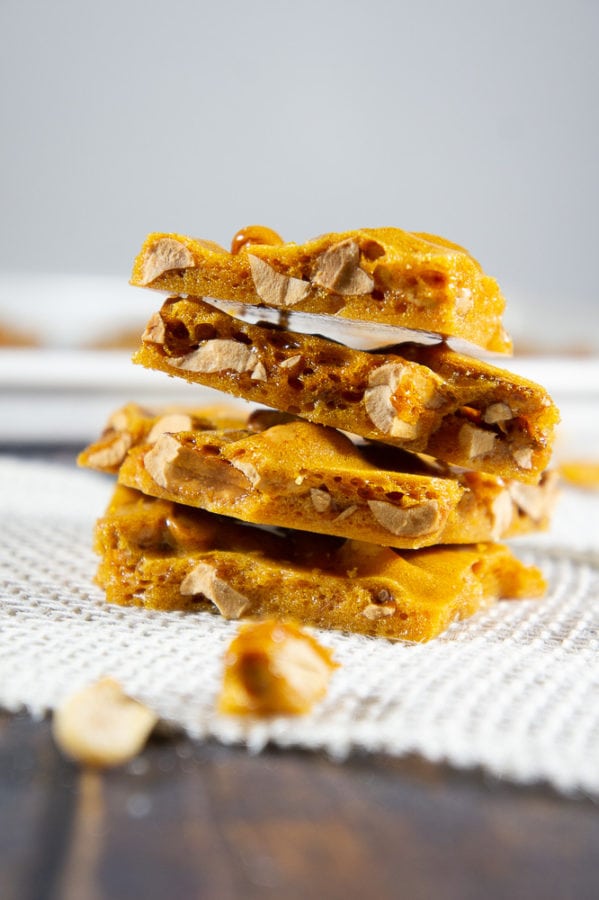
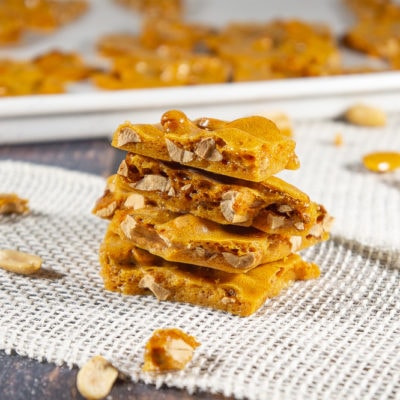
Homemade peanut brittle is easy to make with this microwave peanut brittle recipe. In less than an hour you can have crunchy, caramelized sugar with salted, roasted peanuts ready to eat!
My mom’s peanut brittle was always the best. It sat in a tin on the counter sometime near the beginning of the holiday season. When I moved out I took with me a hand copied notebook of all the recipes I loved, and this microwave peanut brittle recipe was among them.
Truth is, it’s taken me a while to master! Microwaves are finicky things, mine probably doesn’t work exactly the same as yours. But with practice, and then some more practice, I’ve finally mastered the tricks and tips to making perfect homemade peanut brittle every time – with only your microwave. Nifty right? This is a perfect holiday food gift, or just a delicious treat to have around the house.
What is peanut brittle?
The origin of peanut brittle is a bit hazy, maybe it was a kitchen accident, or a primitive first candy made hundreds of years ago, the stories are unclear and vary!
But do know that peanut brittle is just one of many possible variations of brittle. Different countries and cultures across the world use other nuts and seeds and flavorings to make unique and delicious forms of hard sugar brittle. However here in the US, peanut brittle is top dog.
The basics of brittle remain the same no matter it’s additions. Sugar is cooked to the hard crack stage (300°F), mixed with optional additions (nuts, seeds, spices, extracts, butter, baking soda), and poured to cool until set.
Ingredients
With so many options for additions, where does one begin? Luckily from generations of testing I have the perfect ratio of a select few ingredients to make a salty, caramelized sweet sugar candy.
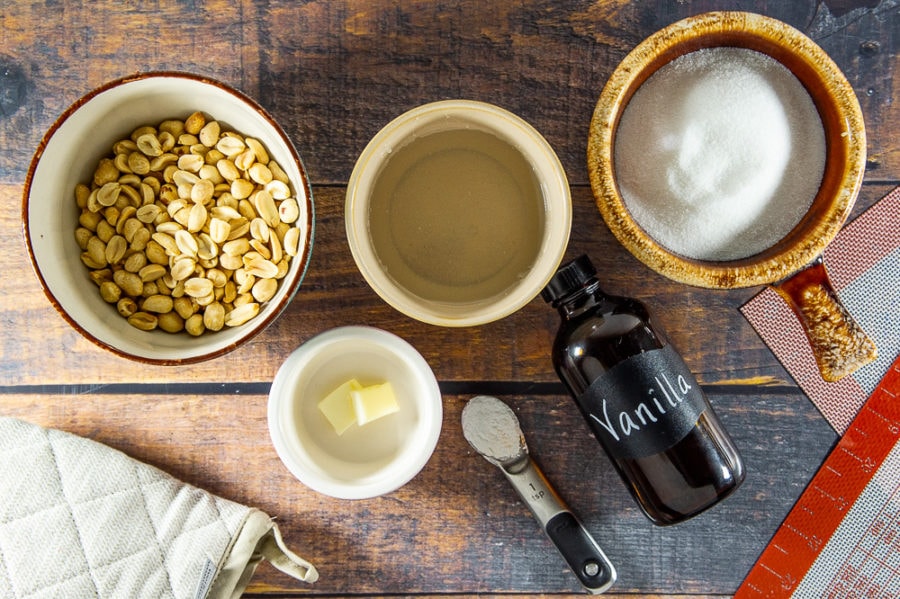
- Sugar – Granulated white sugar is perfect.
- Light Corn Syrup – The combination of corn syrup and white sugar allows the candy to harden to that delicious crunch without being grainy. DO NOT SKIP!
- Roasted, salted peanuts – Technically you can use any form of peanut, but roasted, salted peanuts produce the best final flavor in my opinion.
- Butter – Fat is another important addition to prevent the sugar from becoming grainy when it hardens. Just a touch!
- Vanilla Extract – Yum! That’s all I need to say.
- Baking Soda – When mixed with hot sugar it produces a foaming reaction that creates bubbles in your brittle, which leads to a crispy, crunchy brittle that doesn’t crack teeth.
Read more about the science of sugar in candy making in this article!
Equipment I RECOMMEND for Making Brittle
For the easiest process, and the easiest clean up, I recommend a few specific tools.
- Instant Read Thermometer – Because you’re using a microwave, a candy thermometer would take too long to read the temperature, use an instant read to make sure you’d hit the necessary hard crack stage.
- A silicone spatula or scraper – You’re going to be stirring hot sugar, and this makes getting the sugar back into the bowl so much easier.
- A baking mat – The EASIEST clean up I’ve ever had was using this. There’s no prep needed, just pour on the brittle until set, and it lifts right off. It’s just a quick wipe clean too!
- A clear glass bowl or casserole dish – Part of making peanut brittle in the microwave is watching the color of the sugar. A clear cooking vessel makes it so much easier. I recommend something no smaller than 1.5 qt.
- Pot holders or hand protection – the bowl you’re cooking in gets HOT! Handle with caution!
How to Make Microwave Peanut Brittle
The greatest part about microwave peanut brittle is the quick and easy process. In about 15 minutes, measuring, stirring, microwaving, and pouring included, I had my peanut brittle cooling on the counter. 30 minutes later it was ready to break and enjoy!
For the easiest time making homemade peanut brittle, I recommend getting all your ingredients measured out and reading the recipe ahead of time! Get your baking mat (or a lightly buttered cookie sheet) ready and your ingredients laid out in an step by step fashion.
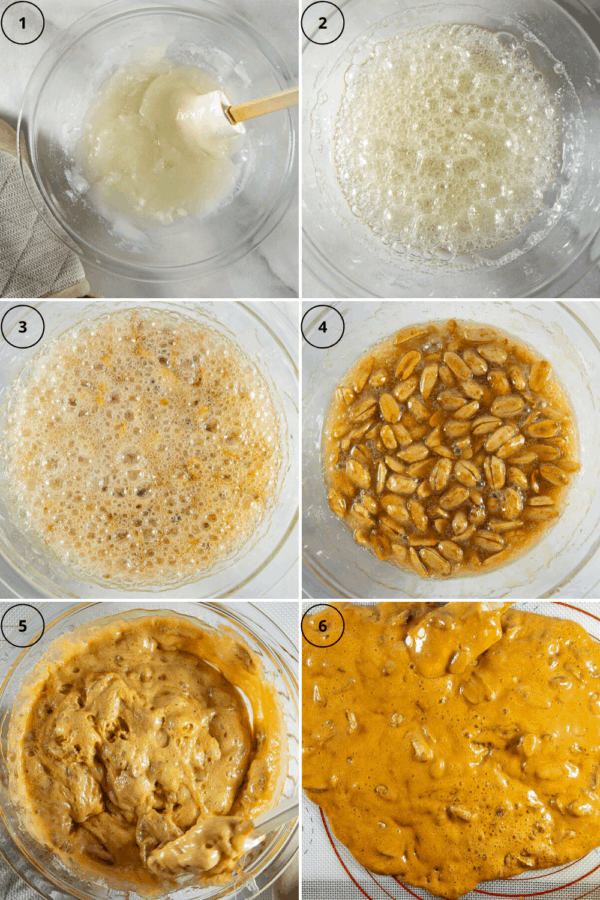
- Mix the sugar and corn syrup in a microwave safe bowl until most of the dry sugar is absorbed. This doesn’t need to be a perfect blend.
- Microwave on high for 4 to 5 minutes. You’re looking for rapid bubbling and a completely melted mixture. When the surface of your mixture is covered in pale, clear bubbles pull it out. Remove with pot holders and stir in the peanuts quickly.
- Return to the microwave for 3 to 5 minutes (it was 4 1/2 minutes exactly for me), until the sugar syrup has changed to a light brown. Think the color of butterscotch. This stage is the most tricky as your sugar can burn quickly, it’s COMPLETELY OKAY to pause the microwave and check the color during the 3 to 5 minutes.
- Using pot holders remove the bowl again and add butter and vanilla, and stir it in. This will deepen the color and sizzle quite a lot. That’s normal and expected! Return to the microwave with your potholders.
- Heat for another 1 to 2 minutes. The color will deepen further, the peanuts will be lightly browned, and the bowl will be very hot. Check the temp with your thermometer and remove (carefully) if at 300°F. Add in your baking soda and stir! The brittle will foam pretty swiftly but stir until all the baking soda is completely dissolved.
- Quickly pour the brittle onto your prepared surface. Use your spatula to spread quickly, but gently. If you wait too long to spread it, it will collapse the bubbles so don’t wait!
- Let cool. When brittle is completely cool to the touch and feels firm and hard (anywhere from 30 minutes to 1 hour) break it apart. I just use my hands!
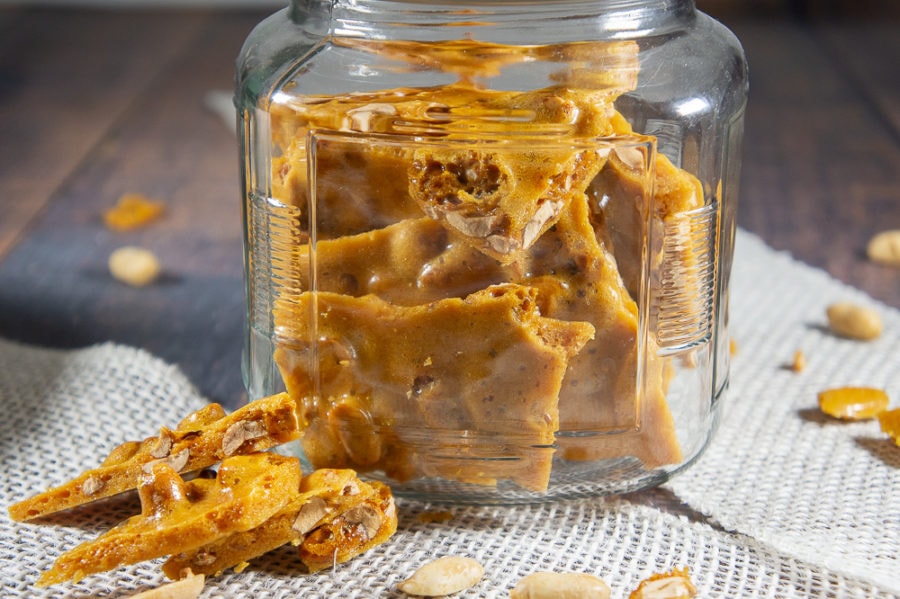
- Store in an airtight container. If planning for longer storage, layer between sheets of wax paper and store in a dark, cool place for best quality. It can be stored for up to 2 months.
Extra Brittle Making Tips
- Don’t wait too long between microwaving sessions, the sugar can cool and it will take longer than the times I’ve listed to get it back up to temp.
- If you’ve gone past or needed much less than the advised time at any stage that’s OK! Your microwave may work differently than mine, which is why I provided average time ranges.
- Do NOT flour the baking sheet if you’re using a buttered surface to cool your brittle.
- If you want to break the brittle with a knife or rolling pin, cover with wax or parchment first. Shards can fly off and they end up all over the place!
FAQ’s
Yes! You can substitute your preferred nut, cashews, pecans, and almonds are all highly recommended. You can even make a mixed nut brittle.
It’s possible to do this without a thermometer if you’re confident you can tell the stages of sugar by color. My mom does it this way and it always works (it’s a secret power I’m convinced), if you’re AT ALL unsure, go with a thermometer.
In theory yes. Sugar can of course be cooked on the stove top, but the steps and processes will differ. It would be a process of cooking the sugar and corn syrup to 300°F, adding in the peanuts, butter, and vanilla, stirring, then adding in the baking soda and pouring onto a prepared surface.
If you try this before I do, I’d love to hear how it works out!
No, I don’t recommend it.
If it’s slightly sticky to the touch, that’s okay. I often find that I prefer brittle a day or two after I’ve made it the best as it dries out a little bit.
If however it is sticking horribly to your teeth when you bite in (a little is normal but if it’s like jaw glue…) then it was likely not cooked to the proper temperature.
The most likely cause is that some of the sugar or nuts burned during the cooking process. Make sure you’re keeping an eye on the color and temperature of your brittle. If anything turns a deep brown color, it’s burned.
If your microwave is old school like mine and doesn’t have a turn table, rotate it manually every minute or so.
Enjoy!
The beauty of such an easy to make, long lasting treat is that in one hour you can be eating your homemade peanut brittle, and still be enjoying it two months from now. No need to worry about staleness, dryness, or any other food gift woes. When you combine this in a basket with some homemade hot cocoa mix, a bit of old-fashioned penuche fudge, brownie mix in a jar, and maybe a jar of spiced pear butter, you’re basically giving a cozy Christmas at grandma’s house as a gift. You’ll be a hit!
I hope you enjoy crunching on your brittle, and until next time, Happy Eating!
Other Food Gifts You May Enjoy
- Spiced Citrus Pear Butter
- Pomegranate Cranberry Jam
- Pomegranate Jelly
- Loquat Jam
- Strawberry Jam
- Homemade Vanilla Extract
- Homemade Hot Chocolate Powder
Other Homemade Candies!
Microwave Peanut Brittle
Ingredients
- 1 cup granulated sugar
- 1/2 cup light corn syrup
- 1 cup peanuts, roasted and salted
- 1 tsp unsalted butter 4.73 grams
- 1 tsp vanilla extract
- 1 tsp baking soda
Instructions
- Prepare all your ingredients, have them measured out and ready to go. Prepare a non stick baking mat or a lightly buttered baking sheet.
- Stir together karo syrup and sugar in a microwave safe bowl.* Place in microwave for 4 to 5 minutes, or until the sugar has dissolved and the surface of the mixture is covered in clear rapid bubbles.
- Remove carefully from microwave*. Stir in peanuts quickly and return to microwave and heat for another 3 to 5 minutes or until sugar and peanut mixture has turned a pale butterscotch color. Watch carefully, pausing the microwave to check if necessary to avoid burning of your sugar.
- Remove from microwave carefully, and stir in the vanilla and butter. The mixture will sizzle and deepen in color.
- When completely mixed in, return to microwave and heat another 1 to 2 minutes. Use an instant read thermometer to check the temperature, when it has reached 300°F, remove from microwave.
- Quickly add and stir in the baking soda. It will cause the mixture to foam rapidly. Stir the soda in completely then pour on your prepared cooling surface. Try to spread the mixture evenly as you pour.*
- Let cool for 30 minutes (up to an hour). When completely cool and hard, break into shards and store in an airtight container. Layer between wax paper and store in a dark, cool place for longest lasting quality. Safe to store up to 2 months.
Notes
Nutrition
Nutrition information and cooking times are provided as a best estimate. Values may vary based upon ingredients and equipment.


I love homemade peanut brittle and this recipe tasted just like my moms! Can’t wait to make again for an everyday treat!
So glad you liked it and are planning to make it again!
Oh wow, I love this recipe! Thank you so much for sharing, it is so easy and so so good!! 🙂
Cathleen, thanks so much. We too love this recipe. I am glad you found it easy to make and enjoyed eating it.
This is a super food gift recipe. I made a little just to try it out. Really yum! Planning to make more and give it as an edible Christmas gift!
That’s awesome to hear! I’m glad you enjoyed it!