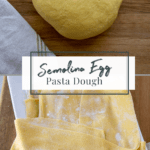
Homemade Semolina Pasta Dough
This page contains affiliate links. For more information please read my Disclosure Policy.
To make pasta with the ideal balance of tenderness and bite, try this Homemade Semolina Pasta Dough. A blend of flours, eggs, and salt creates a delicious noodle with the perfect chew that can be cut into noodles or filled. I’ve shared how to make it by hand, with a machine, and included all the tips you need.
It’s been one of my long-time goals to discover how to make delicious homemade noodles. You know, the kind you pay extra for when you go out to eat at a classy Italian restaurant.
I had no idea that I’d discover so many different possible doughs and methods along the way! I’m sure there are many other yummy types of pasta in my future, but for now, my go-to and favorite is my homemade semolina pasta dough.
It’s the first one that I’ve found has the best balance of chewiness and softness. It holds up well in lasagna and hearty sauces, and is great for filling for ravioli. I’m excited to share exactly how to make it with you.
Ingredients & Equipment
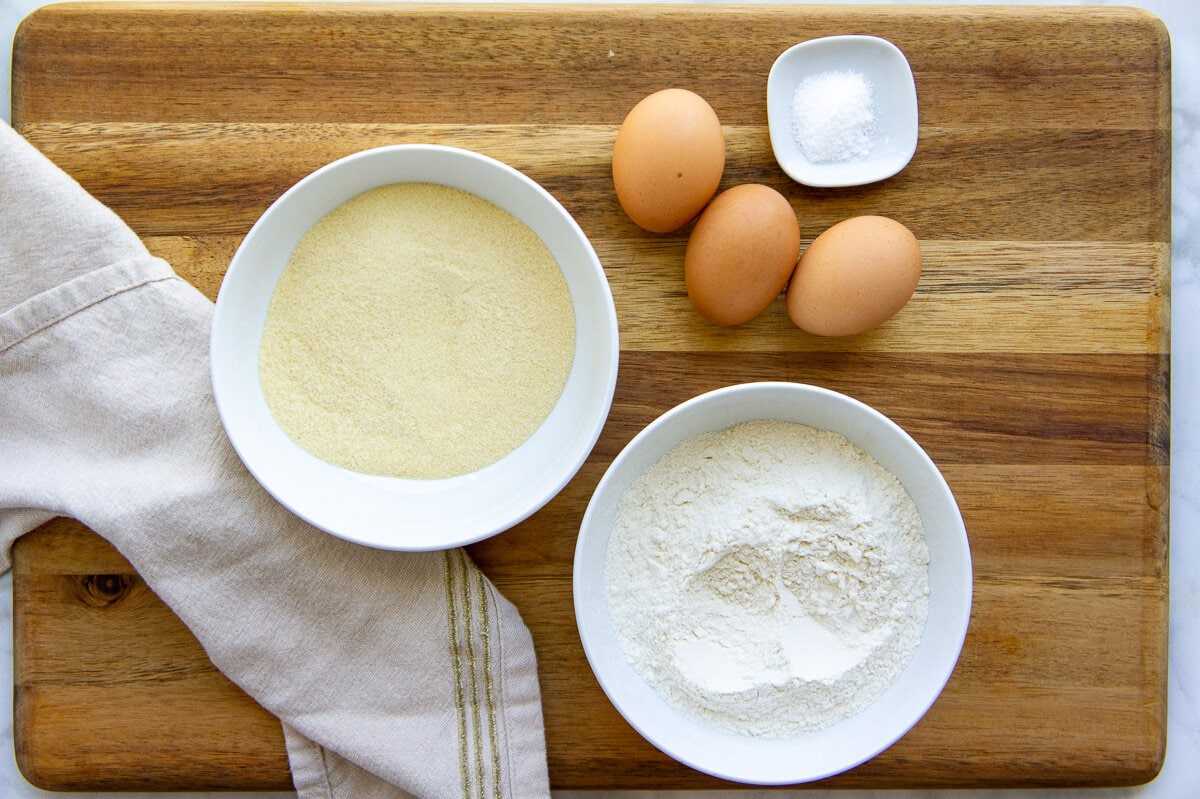
My semolina pasta dough uses a specific ratio of ingredients. While you can swap in AP for the 00 flour, this will NOT work with all AP flour – the amount of moisture and fat matters! I’d advise looking at an egg pasta dough instead!
- Semolina flour – This is a wheat flour that adds a lovely chew to pasta dough.
- 00 Flour – This is the soft wheat flour often used in Italy for fresh pasta. I’ve had great luck finding it, but if you can’t All-purpose flour is the best alternative.
- Eggs – I use a combination of 2 eggs and 1 egg yolk to add the perfect ratio of moisture and fat.
- Salt – I do like to season the pasta dough a little at this stage, but salted water during cooking is also vital!
The importance of ratio – Semolina is a coarse, high protein flour made from hard wheat, and too much can make a tough, gritty texture. Balancing that with 00 or AP flour is essential to a tender, but sturdy noodle.
The ideal ratio is about 55% 00 or AP to 45% semolina – so just a little less than half the flour should be semolina.
Here are some optional items that can make your pasta making experience more fun!
- Pasta Roller – A pasta Kitchenaid attachment or one that attaches to the counter, like my Weston manual one, is definitely helpful!
- Rolling Pin – Go old school and use a rolling pin instead. I like a french style pin.
- Bench Scraper – I find this vital for bringing the dough together, especially if you do it by hand.
- Drying Rack – This is fun if you want to dry your pasta for storage, you can also just use a floured sheet pan, or clothes hangers hung in a clean place.
- Food processor – If you have one, this can shave some time off of kneading and help the dough come together faster. This is the food processor I use.
- Pasta cutter – This tool can make even noodles easier to do by hand. You can also just use a knife!
- Ravioli cutter – This is what I use to help make my filled pastas so much easier. You could also use a ravioli stamp tool or a ravioli tray to make things quicker.
How to Make the Dough
Making semolina pasta dough isn’t complicated. It’s a process you’ve maybe even seen before. Follow my easy tips and you’ll see that making homemade semolina pasta is something you can easily do any night.
- Thoroughly clean your working surface. I find it easier to work on a counter, or large cutting board.
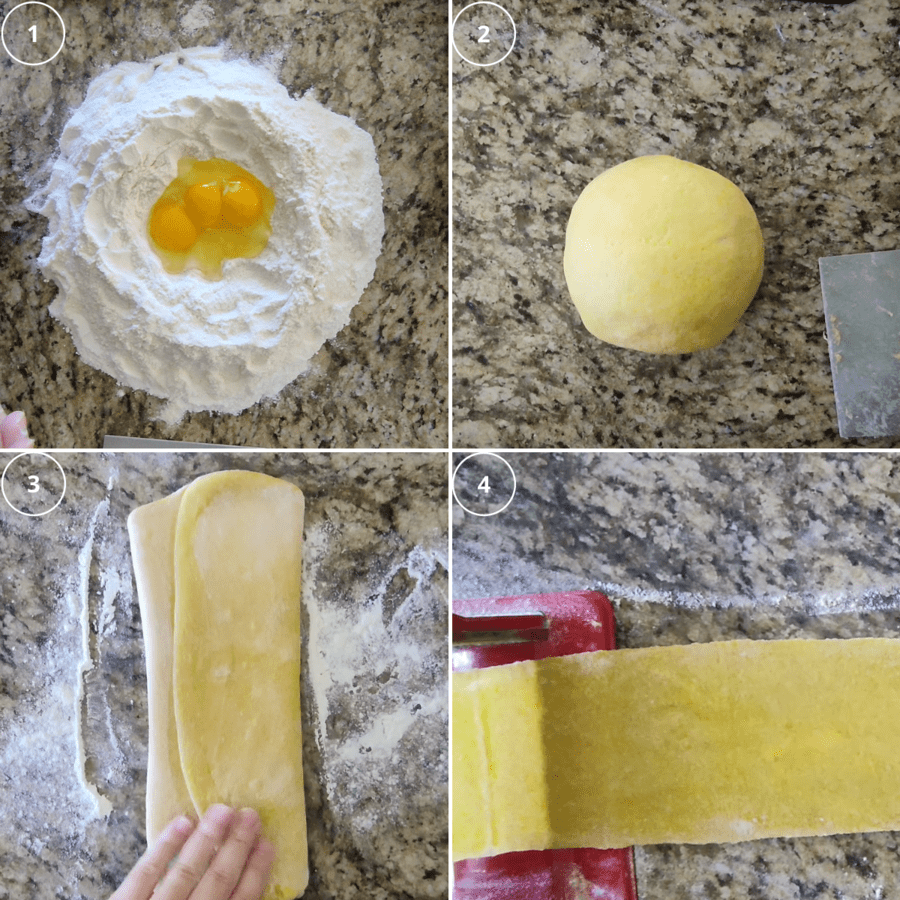
- Mix your flours on the surface, then form into a mountain and press a well into the center, like a crater in the top.
- Crack two eggs and one egg yolk into the center. Add the salt.
- Use a fork and start whisking the eggs in the center, once they’re mixed, begin making wider strokes, whisking some flour into the center too. (If the well breaks, don’t worry! Just scrape it back into the mix with a bench scraper.)
- Once the eggs and flour have been somewhat combined, use a bench scraper and your hands to start working the crumbly mixture into a dough.
- Knead until it’s smooth and elastic, it will be rough at first, but it will come together!
How to use the food processor
If you want to cut down on the kneading time, start the dough in a food processor.
- Add both flours, the eggs, egg yolk, and salt into the carafe.
- Pulse until it forms coarse crumbs.
- Turn it out onto a clean, dry surface and knead until it’s a smooth, soft dough.
The importance of resting
Next step is to give the gluten you’ve created by kneading time to relax. It’s VITAL for successfully rolling it out.
Allow your semolina pasta dough to rest at room temperature for 30 minutes. Keep it tightly wrapped in cling wrap or a beeswax wrap to prevent drying out.
If you don’t plan to roll it out after 30 minutes, store it in the fridge instead. Then simply pull it out 30 minutes before you want to roll it out. It can be kept there for 1-2 days.
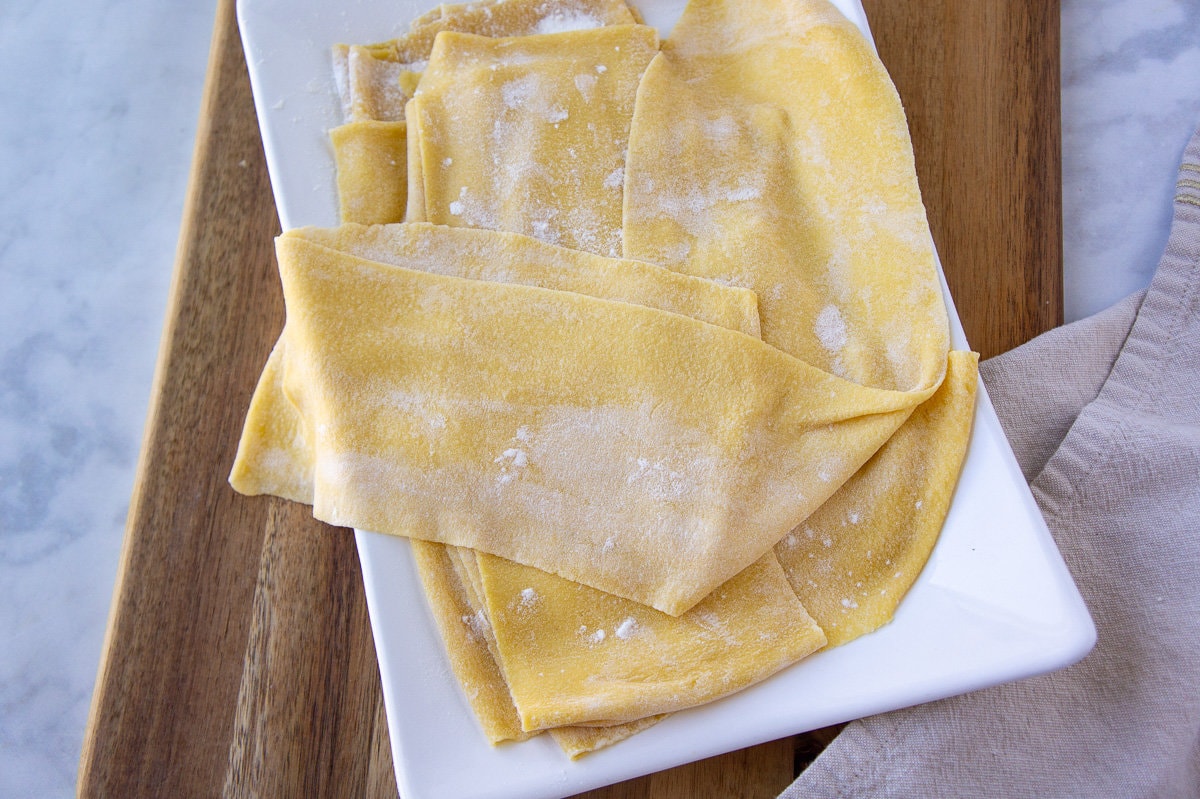
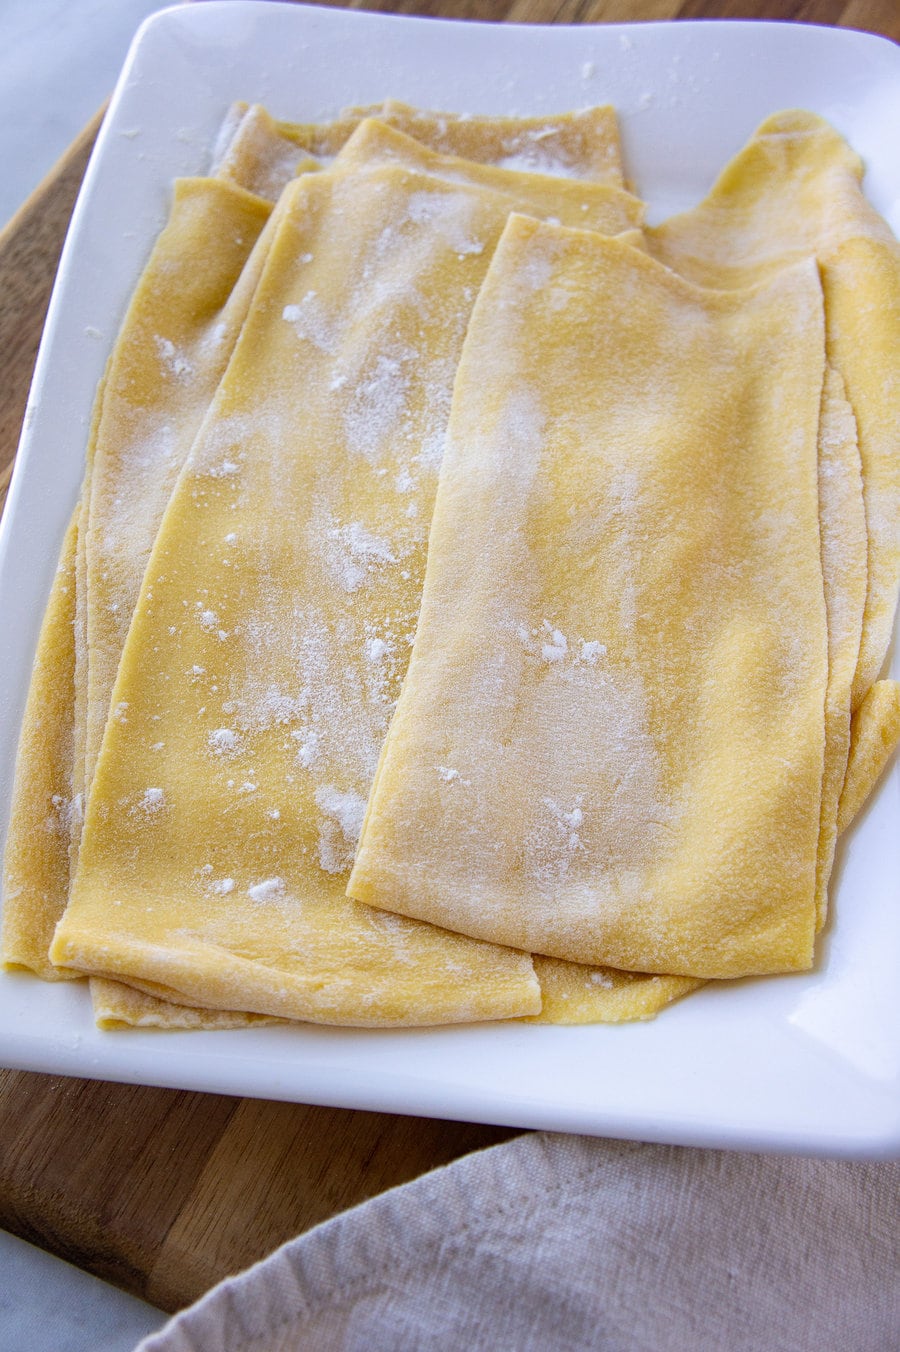
Rolling out the Dough
To roll out your dough you have options, by hand or with a machine. I definitely prefer a pasta machine, which helps the thickness stay uniform.
- Cut the pasta dough into 4 wedges. Wrap 3 back up and work with 1 at a time.
- Shape the wedge into a rectangle on a lightly floured, clean work surface.
- Use a lightly floured rolling pin and roll it into a long rectangle about ½” thick.
- Fold it up like a letter then turn it so the open edges are on the top and bottom.
- Begin rolling it out again. You want it to be thin enough to fit through the widest setting on your pasta machine. If it gets too long to manage, cut in half, cover one half, and continue working with the remainder.
- When it’s thin enough, lightly flour your pasta machine and begin feeding it through on the widest setting.
- Repeat.
- Reduce the opening to the second widest setting and run the pasta sheet through it.
- Keep the surface and machine lightly floured to prevent sticking, and keep working the pasta dough through it on progressively thinner settings until it’s the thickness you prefer.
I usually roll it out to a 3 for my lasagna recipes, or a 2 for noodles or ravioli. You may like it thinner! Experiment and enjoy the process.
To keep rolling it out by hand, just stick with your rolling pin. If the semolina dough starts to resist or shrink back at any point, just cover and let it rest for 5-10 minutes. The gluten will relax and you can keep rolling.
Cutting Your Pasta
I first started making my homemade semolina dough for lasagna, and it’s still my absolute go to for any layered pasta. It’s PERFECT for soaking up the sauce, and still retains enough chew to stand up to toppings. It’s also great for noodles and filled pasta!
To cut lasagna sheets, you simply roll out the dough to your desired thickness, then trim it into the right size for your pan. Easy!
For filled pasta you also can use long pasta sheets. You can either lay one sheet on top of another after you’ve added filling, or fold it over on itself. Use water to seal the sheet and a pizza cutter or ravioli cutter to trim it up. You can also use a ravioli tray. Check out my tool recommendations above if you’re interested!
Noodles can be made in a few ways. My pasta machine has a cutting attachment that can produce flat noodles like fettuccine. For wide thick noodles like pappardelle, I cut it by hand.
Hand cutting is always an option. Flour the pasta well so it doesn’t stick, then roll it up gently. Slice noodles to your desired thickness and toss with more flour (it all comes off during cooking! Don’t worry about over-doing the flour.)
How to Store Pasta
Now that I’ve started you on an obsessive journey to making tons of homemade semolina pasta dough, you’ll need to know how to store it.
- Dough or rolled pasta can be frozen up to 2 months, or stored in the fridge for 2 days. Make sure it’s well floured to prevent sticking. Coil noodles into nests on a baking tray and freeze, and again WELL FLOURED!
- Dry the pasta by hanging it on a rack, or by cutting and making nests – make sure to flour VERY well. It can be stored once COMPLETELY dry for up to 6 months in the cupboard. Make sure it’s stored in an airtight container.
How to Cook Fresh Pasta
Now for the best part – the eating! The good news is that fresh pasta dough cooks really fast! Semolina pasta only takes a few minutes at most to cook.
- Use well salted water. It makes a huge difference in the final flavor of your dish.
- The cooking time will depend on the thickness and type of noodle. Start checking after 90 seconds.
- No need to pre-cook for lasagna!
A Few Recipes to Try with Your Homemade Semolina Pasta!

Homemade Semolina Pasta Dough
Ingredients
- 115 grams 00 Flour or All-purpose flour
- 100 grams semolina flour
- 2 whole eggs
- 1 egg yolk
- 1/2 teaspoon sea salt finely ground
Instructions
Making the Dough
- Mix the two flours on a clean surface or in a large bowl.*
- Make a well in the center and add the salt, 2 eggs, and egg yolk.
- Begin whisking the eggs with a fork. Once they're mixed, slowly move the fork outward to catch flour and start blending it in.
- Once all the egg has been combine with flour, start working it into a dough with your hands. It will be crumbly at first.
- Knead for 5-10 minutes, or until the dough is smooth and elastic.
- Cover the dough with plastic and let it rest at room temperature for 30 minutes.**
Rolling & Cutting the Dough
- Divide the rested dough into wedges. Cover all but one.
- On a lightly floured surface shape one wedge into a rectangle and begin to roll it out with a floured rolling pin.
- Once it's a long rectangle, fold it up like a letter and turn it sideways so the smooth edges are on the sides.
- Roll it until it's thin enough to feed through the widest setting on your pasta machine.
- Lightly flour the pasta machine and dough and start feeding it through. Run it through the widest setting twice, then through progressively narrower settings at least once. Keep the surface floured.
- When the pasta is your ideal thinness (2 or 3), then run it through the cutting attachment on your pasta machine, or use a knife. For noodles, flour the dough generously and gently fold up before slicing noodles. For lasagna, simply slice the sheets into desired lengths.
Cooking the Pasta
- Bring a pot of generously salted water to a rapid boil.
- Drop in the pasta and cook for 90 seconds to 3 minutes, checking early for doneness.
- Toss with sauce as desired. There is NO need to cook noodles first if making lasagna.
Drying/Storing Pasta
- To dry it, flour the noodles very generously to prevent sticking and coil into nests on a baking sheet. OR, hang from a drying rack. Once completely dry, store in an airtight container for up to 6 months.
- To freeze, generously flour and shape into nests then freeze on a baking sheet. Once frozen transfer to a storage bag or container in the freezer for up to 2 months.
- You can also store dough or cut noodles (well floured!) in the fridge for up to 2 days.
Notes
Nutrition
Nutrition information and cooking times are provided as a best estimate. Values may vary based upon ingredients and equipment.


I made it as per recipe but it was so hard should it have had some water in it ?
The pasta dough does feel hard to knead at the beginning of the process, but if it doesn’t get more glutinous and flexible, some water or oil can help loosen it up, but be cautious! Too much can ruin the texture.
I’m going to make this today, when you say flour generously, what flour do I I use?
Katie, I would always recommend using the flour you are working with in a recipe, for this recipe I would stick with the semolina flour. Good luck and I would love to hear how your pasta turns out.