Chocolate Filled Bread
I was compensated for this post by Paradise Fruit Company . All opinions and recommendations expressed are completely my own.
This page contains affiliate links. For more information please read my Disclosure Policy.
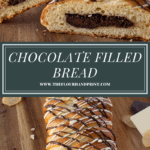
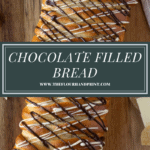
Homemade chocolate filled bread is like inviting your favorite bakery into your home kitchen. A sweet roll inspired yeast dough is filled with a irresistible chocolate filling spiked with nuts and ginger the braided and baked for a stunning, homemade dessert bread.
Ah bread, here we are again! Truthfully I start to get a little antsy when I haven’t added a bread recipe in a while, I make it every week! This year I had such a favorable response to my Asiago bread that I figured it was high time to share another ‘gourmet’ loaf for my adventurous bread eaters and bakers out there.
This one was inspired by a fun new product I was working with – Paradise Fruit Company’s Crystallized Ginger. It’s far superior to any supermarket crystallized ginger I’ve used. Instead of large gummy chunks, Paradise’s version is thin chip shaped pieces which has a much better flavor and texture.
I knew it would pair beautifully with chocolate and wanted to give you a recipe that packs the combo into one bite. Letting a chocolate croissant inspire, I was off to the races. Many, many iterations later, a gorgeous chocolate braided bread that sings with flavor.
Ingredients for Chocolate Filled Bread
If you’re sitting there thinking that this must us tons of complicated ingredients, I’m happy to tell you – nope! Everything works thanks to the perfect blend of staples you’ll find any day in a from scratch kitchen.
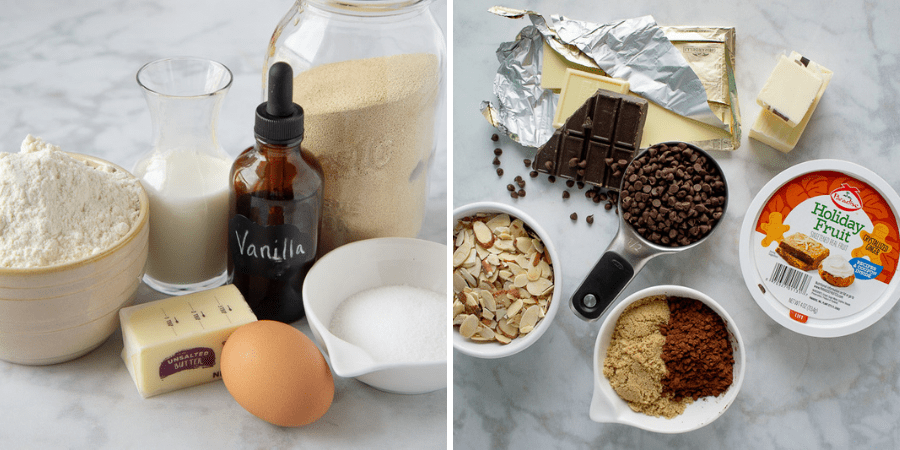
For the bread dough, after many tests, I settled on a sweet dough, very similar to the one I used in my cream cheese cinnamon roll recipe. To make it you’ll need:
- Bread Flour
- Milk
- Butter
- Active dry yeast
- Sugar
Don’t rush to the grocery store if all purpose flour is what you have, it will work just fine, but you may find you need a tablespoon or two more. You can also use instant yeast here, simply skip the proving step and move right along with the mixing!
Once I had a dough I was happy with it was time for the filling. I absolutely love chocolate croissants, but I never feel like there’s enough filling inside, I also knew just slabs of dark chocolate wouldn’t work here.
I finally settled on this perfect combo of ingredients:
- Semi-sweet chocolate chips
- 50-65% Baking chocolate
- Almonds, roasted
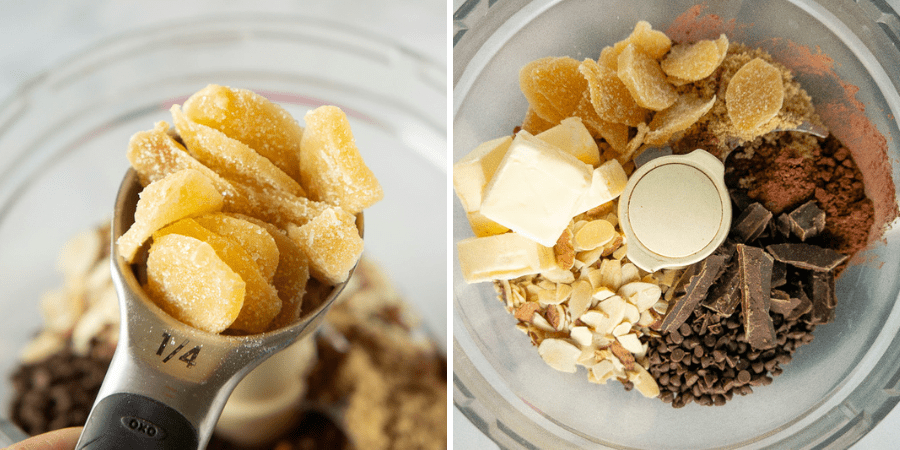
- Crystallized Ginger
- Cocoa Powder
- Butter
Unlike some baking recipes, you can use either dutch processed or natural cocoa powder here. I preferred the dutch processed for smooth final flavor. If you’re wondering what the heck the difference is, definitely check out my guide to baking with chocolate for more details!
You can easily choose plain almonds if you have that, or just give them a quick roast while your bread is rising – heck the oven heat will help it rise!
If you’re interested in swapping out chocolates, you should be fine substituting milk chocolate chips or chocolate bar for either in the recipe. White chocolate would work as well – although I caution you, it would be very intense.
One word to the wise – don’t try skipping the chocolate chips. Without them, the filling hardens unpleasantly when the bread is cool. With them, thanks to the soy lecithin in them, we get a soft snackable bread that’s delicious warm and cool.
How to Make Chocolate Braided Bread
When you’re ready to bake, just make sure you have a window of about 3 1/2 to 4 hours. You’ll need to allow for rise time to make the perfect, tender chocolate bread.
Making Sweet Bread Dough
We begin with the dough, it’s made just as many yeast breads are – proof the yeast in lukewarm liquid, and when foamy, combine with the other ingredients and knead until a smooth soft dough forms. Here are my best tips for making this dough successful!
- Add a teaspoon or so of sugar to the milk before adding the yeast to proof. Yeast loves sugar, and this will speed up and amplify your proofing.
- It’s better to use cool milk rather than hot milk! If your milk is above 110°F when you add the yeast, the yeast will die (flat bread!). It should feel no warmer than room temperature tap water.
- Don’t skip out on the kneading! This dough really benefits from a good knead, so if by hand go for a full 8 to 10 minutes, or 7 to 8 minutes on medium speed in your stand mixer. It should be smooth, tacky, and soft.
- Add a tablespoon or so of flour if the dough is sticking to the surface or the mixer bowl after a few minutes of kneading. Let the flour incorporate, then repeat if necessary until the dough sticks to itself instead.
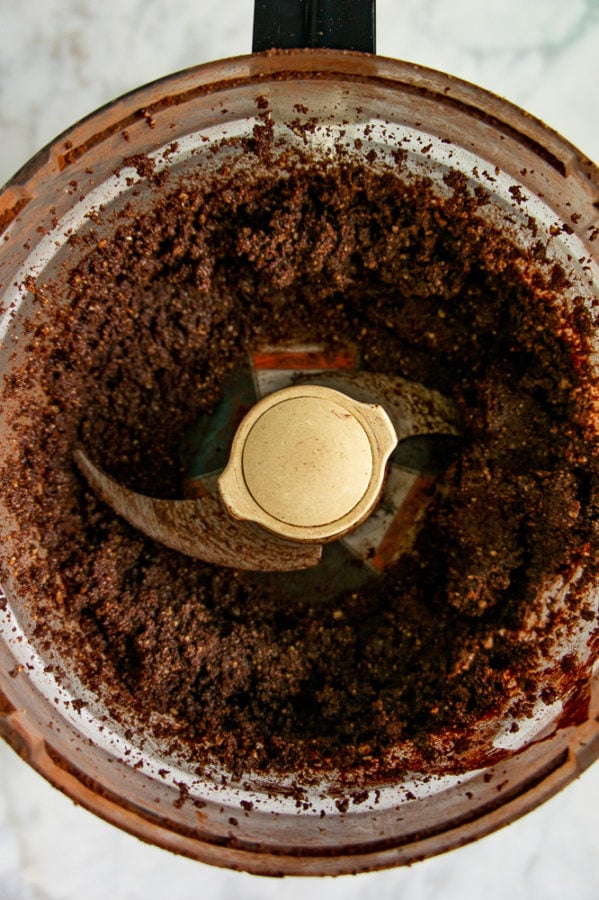
Making the Filling
As your bread loaf approaches the end of it’s rise, go ahead and get out your food processor. It’s just a quick blitz of all your filling ingredients to create the chocolate nut filling. When it looks like chocolate sand, you’re done!
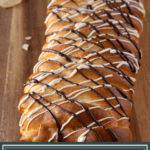
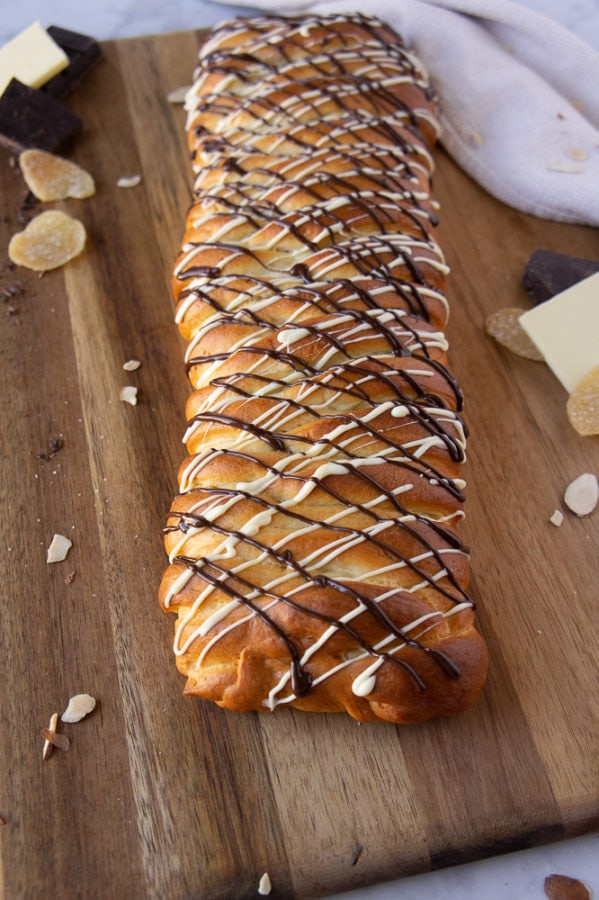
Creating the Braid
When your dough is risen, turn it out on a clean work surface, floured it needed. I highly recommend a silicone baking mat if you’re a bread baker, it’s the only work surface I use anymore. I do my shaping and baking all right on it!
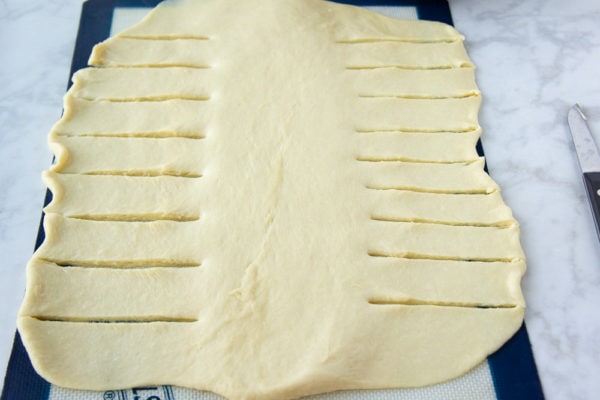
- Create a 15 inch by 12 inch rectangle by gently rolling out the dough. If it resists or shrinks back let it rest, covered, for a few minutes, then try again.
- Cut 1 inch strips up the sides of the dough, along the long side. You want these to take up about 1/3 of the width of your rectangle on either side. Keep the number of strips on either side even!
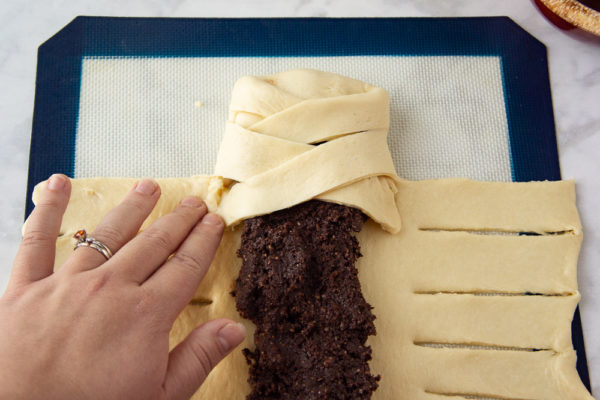
- Flatten the chocolate filling into a 1 inch thick rectangle that fits along the remaining middle third. No need to get out the ruler, just try to add in evenly and consistently down the length of the dough, leaving 1/4″ to 1/2″ at the top and bottom of the doughs.
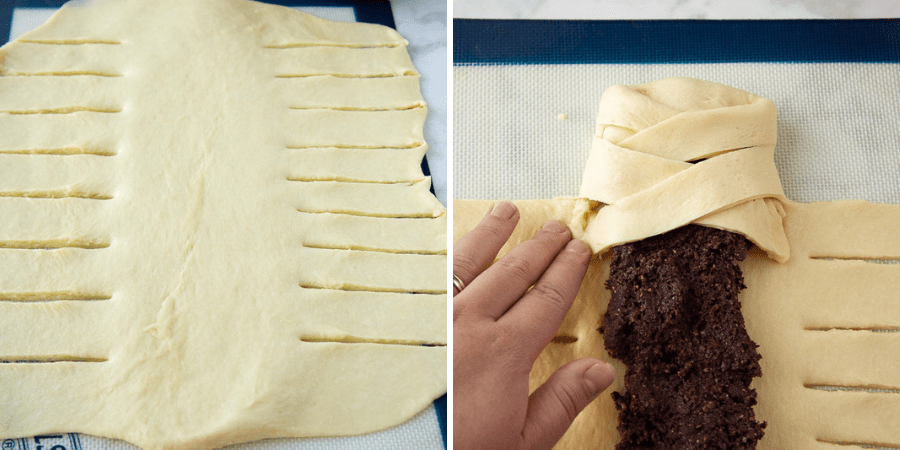
Now onto the folding! This is the part that I think most are concerned by, but this faux braid is super easy!
- Starting at the top, fold the edge down over the chocolate.
- Then fold the first strip over, pressing the edge down gently, but firmly into the base of the strip diagonally beneath the one you’re folding. Repeat, alternating sides, until you reach the final two at the bottom.
- To finish the braid, simply fold one of the final strips across the chocolate filling horizontally. Press the edge into the base of the final strip.
- Fold the bottom edge up over that.
- Then tuck the final strip across, pulling gently to tuck the edge underneath the bread loaf on the opposite side.
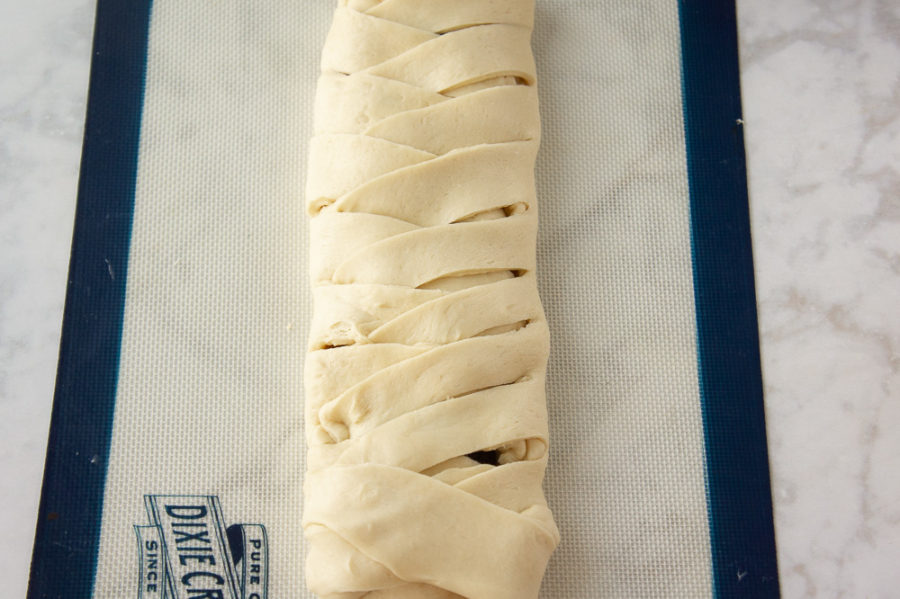
Cover with a clean towel or a piece of plastic wrap sprayed lightly with oil to prevent sticking. Let your chocolate filled bread rise until very puffy and swollen, about 45 minutes to 1 hour depending on the warmth of its resting place. I highly recommend you transfer the loaf to a baking pan now, so you don’t disturb the rise later.
Just before baking brush with milk to help the crust darken, and bake until golden and sounds hollow when tapped on the bottom.
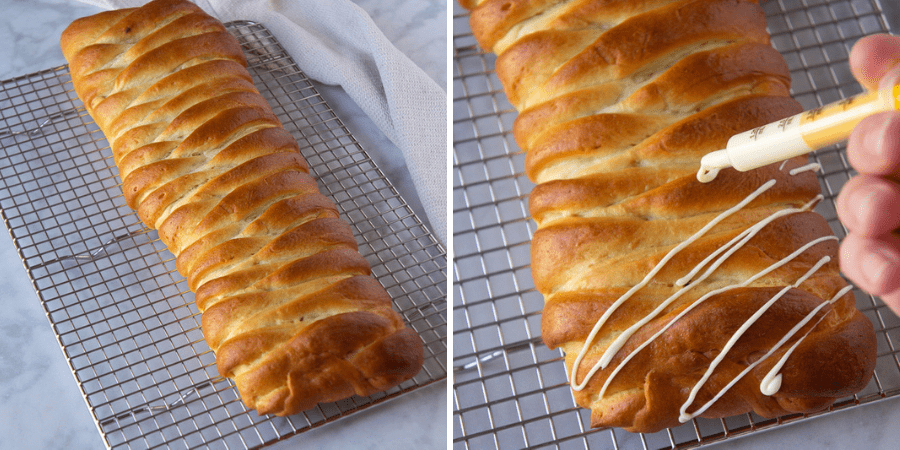
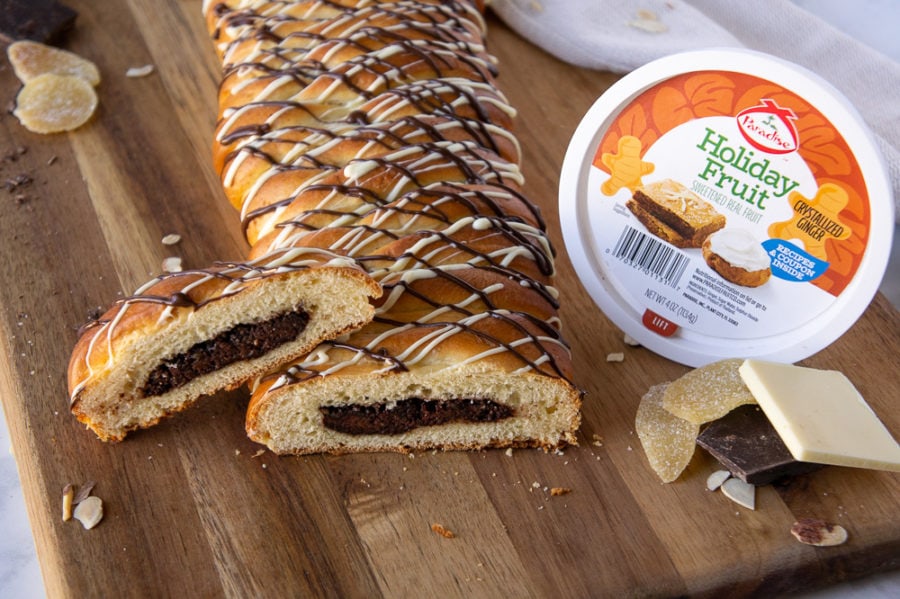
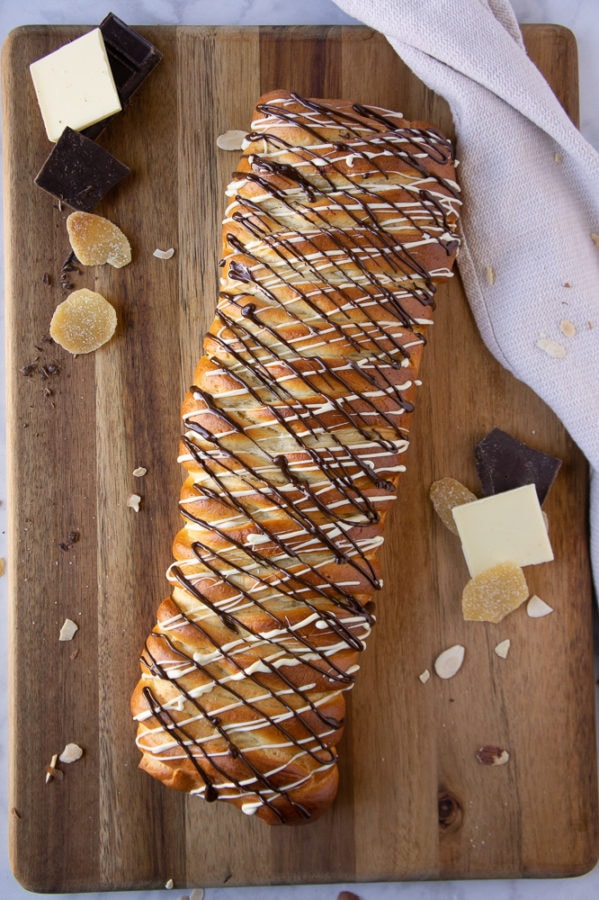
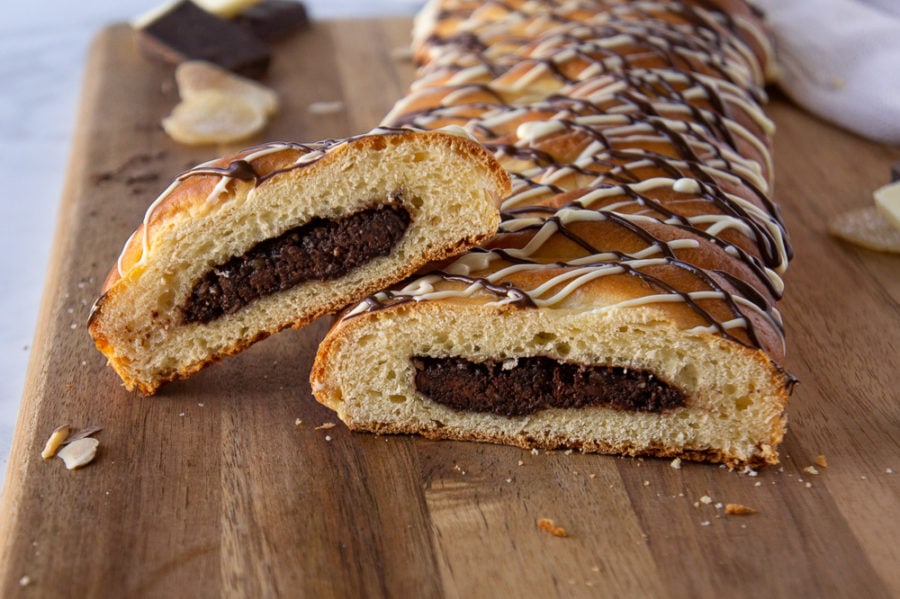
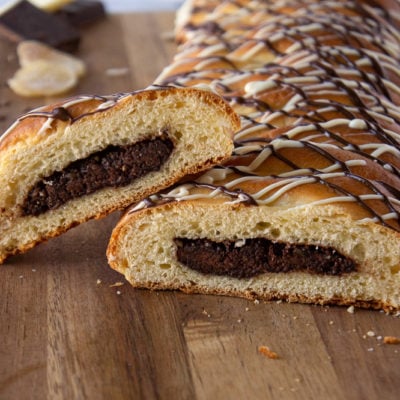
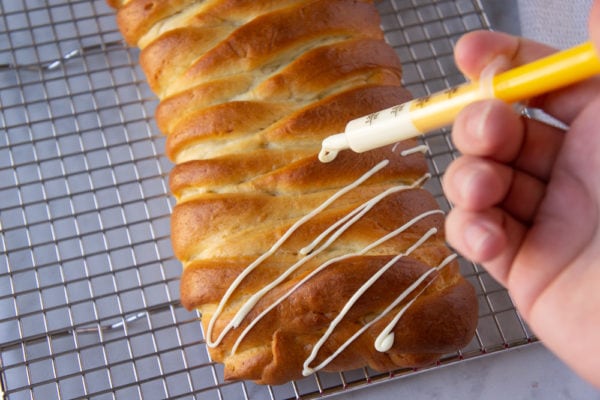
Transfer to a cooling rack immediately to cool. Once cooled, you can choose to decorate your braided chocolate bread further with a drizzle of more melted chocolate! I used about 1 ounce of each white and dark chocolate, and use an old Tylenol syringe of my toddlers to drizzle like crazy!
This is also a great time to add flaked almonds, chopped strips of crystallized ginger, or chocolate shavings.
FAQ’S
You can safely store the bread on the counter, tightly wrapped or in an airtight container, for 3 to 4 days.
I freeze bread every week, please do! Enjoy a slice whenever the whim hits! You can freeze it whole, and ideally without the chocolate drizzle for up to 3 months. Chocolate discolors in the freezer so I would wait to drizzle and decorate once thawed.
You can also freeze individual slices on a baking sheet, then transfer them to a container when frozen for easy single portion servings.
Both? I was shamelessly stealing small slices from the loaf whenever I happened to be standing at the kitchen. But a warm slice with a little swoosh of butter was heaven. Be careful not to melt the chocolate to much!
Eat & Enjoy!
Now that you’re drooling and craving all things chocolate, I encourage you to feel a little fancy this year and bake yourself a loaf of gourmet chocolate filled bread. All the joy of a chocolate pastry, without bothering with the pastry! If you happen to have all the goodies to make it, I highly recommend making yourself a Maple Latte alongside your breakfast slice.
I hope you enjoy this truly, I had such fun making it! Taking that first perfect bite of sweet bread, filled with nuts, chocolate, and subtle ginger spice felt like a gourmet bakery pastry had found it’s way into my oven. And a braided chocolate bread just looks so pretty! Enjoy foodie friends, until next time, happy eating!
Don’t forget to check out these other fabulous bread recipes if you liked this one!
- Christmas Star Bread
- Sweet Braided Bread
- Apple Cinnamon Pull Apart Bread
- Chocolate Raspberry Swirl Brioche Buns
Chocolate Filled Bread
Ingredients
Bread Ingredients
- 228 – 260 ounces bread flour 1 3/4cups – 2 cups
- 56.7 grams butter, melted and cooled 4 tablespoons
- 4 fluid ounces milk* 1/2 cup
- 2 1/4 teaspoon active dry yeast
- 50 grams white sugar
- 1 large egg room temperature
- 1/2 teaspoon vanilla
Chocolate Filling
- 1/2 cup semi-sweet chocolate chips
- 1/4 cup baking chocolate, chopped 50-65% cocoa (1 ounce)
- 1 1/2 tablespoons cocoa powder
- 3 tablespoons brown sugar
- 112 grams almonds, roasted 1/2 cup
- 70.8 grams butter 5 tablespoons
- 56 grams crystallized ginger a packed 1/4 cup
Chocolate Drizzle
- 58 grams chocolate of choice 2 ounces
Instructions
Bread Dough
- Heat your milk to just lukewarm and add one or two teaspoons of the sugar and the yeast. Stir, and let proof until foamy.
- Combine 228 grams or 1 3/4 cups flour, butter, remaining sugar, the egg, and vanilla into the bowl of your stand mixer, or a large mixing bowl. Add in foamy yeast and milk mixture.
- Place on your stand mixer, fitted with a dough hook, and turn on low. You can also mix by hand.
- When a dough has formed and the flour is absorbed, turn the mixer to high, or begin to knead and work the dough. Add flour in tablespoons as needed if dough is too sticky to handle, or sticking to the sides and bottom of the bowl.
- Knead until soft, tacky, and smooth, 7 to 8 minutes on the stand mixer, and around 10 by hand.
- Cover and let rise in a warm place for about an hour, or until doubled in size.
Make the Filling
- In the last 20 minutes of your dough's first rise, combine all the filling ingredients in the bowl of your stand mixer.
- Blend until it forms a sticky, grainy paste, similar to wet sand. Set aside.
Shaping and Baking
- When the dough is risen, turn out onto a clean non stick surface, or lightly flour work surface. Gently shape the dough into a 15 x 12 inch rectangle.
- Working from top to bottom along the 15 inch side, cut one inch strips from the edge of the dough to about 1/3 of the way in.

- Repeat on the other side, leaving the middle third of the dough for the chocolate filling.
- Place the chocolate filling along the middle of the dough, leaving 1/2 inch at the top and bottom. Mold the filling evenly and flatten it gently to about 1 inch thick, before braiding for best results and even chocolate distribution.
- Begin folding, starting by tucking the top 1/2 inch down over the top edge of the chocolate filling.
- Working from one side to the other gently lay strips across the filling, pressing the end into the base of the strip diagonally below it.
- Repeat until you reach the final strip and the bottom edge. Fold the bottom edge up over the chocolate filling before the final strip of dough.
- Stretch the final strip of dough across the dough, securing it gently underneath the loaf. Transfer to a parchment or silicone lined baking sheet.
- Let rise again, covered by a towel or gently oiled plastic wrap, until very puffy, about 45 minutes to 1 hour. Preheat your oven to 350°F after 35 minutes.
- Gently but generously brush milk on the loaf, then bake for 20 to 25 minutes, or until the top is golden and crisp and the bottom sounds hollow to when tapped.
- Transfer to a cooling rack right away and allow to cool before decorating.
- When ready, melt your chocolate of choice in the microwave, stirring every 20 seconds until it's smooth and glossy.
- Drizzle over the loaf as desired. Serve, or let the chocolate harden, and store in an airtight container, or tightly wrapped, for up to 3 days.
Notes
Nutrition
I’d love to hear what you think, feel free to tag me on Instagram @theflourhandprint so I can see how it went! Until next time, Happy Eating!
Nutrition information and cooking times are provided as a best estimate. Values may vary based upon ingredients and equipment.


I dont have the crystalized ginger can i leave it out?
Yes! Feel free to skip it.
Hi Mikayla,
Snow day baking today so I do not have any crystallized ginger. Is it possible to use ground ginger?
Hi Renee, you can definitely swap it in, I would use only 1/2 a teaspoon of ground ginger to start and taste the filling, adding up to another 1/2 teaspoon of you can’t taste it. I hope that helps and enjoy the snow!
Perfect thanks so much!
Renee, I’m happy you enjoyed the recipe and you’re welcome!
I don’t see the chocolate chips in the recipe. How much do you use?
Ooh my gosh! Thank you for pointing that out! It was 3/4 cups of chocolate chips. I will fix that ASAP 🙂
The flavor is so perfect, the addition of ginger is a must! The family was so satisfied with the bread, thank you!
I’m so glad everyone enjoyed it, that ginger is key, right? Thanks for letting me know how it went!
I’m all about chocolate and bread, and this one sounds amazing!
Thanks Linda, hope you try it out!
This recipe reminds me of the coffee cakes my Dad would bring home from our local bakery when I was a kid. I cannot wait to make this for Christmas morning ~ thanks for the recipe ?
Aw, thanks for sharing that with me! I hope you enjoy it and it tastes as good as those cakes you loved 🙂
Made this for a girls brunch and it was a hit! Fluffy pastry and chocolate, what’s not to love?
My thoughts exactly ;), glad you all enjoyed it!
Definitely a recipe to get going. I just cant wait to try it out. My kids to have a feast.
Thanks Veena, I hope you all enjoy!
Mmm, you had me at chocolate. I have an event coming up and I think I’ll bring this bread. Im sure it will be a hit and just hope it turns out as beautiful as yours did.
I hope it does too! It’s definitely pretty enough to share at an event. I hope you all enjoy it!
oh my gosh, this looks absolutely amazing. I love the filling – and that it includes ginger with the chocolate. I add ginger to all kinds of things. Saving this one to make over the holidays!
Thank you Susan! I was really proud of this one, definitely a great one for the holiday parties! I hope you like it as much as we do 🙂
I made this for our Saturday brunch yesterday and the gang went nuts over it. It looks more complicated than it actually was. Oh, the chocolate filling was amazing. I’m saving the recipe to make for the holidays, plus I’ve got several families I’m going to make it as a gift.
Thank you for letting me know how well it went. That’s the secret, it looks so fancy, but it’s actually quite easy! I’m so glad you enjoyed it enough to gift it too, I hope everyone loves it as much as your friends did!
This bread looks like such a stunning treat for the holidays! I love the combination of chocolate and spice!
I hope you all give it a try this holiday season!